🎯
Precision
A sharp edge follows the intended cutting line and produces uniform portions,
accurate brunoise, clean slices, and refined presentation.
Professional Culinary Foundation
Knife Skills & Sharpening
A chef's knife is an extension of the hand. Precision, speed, consistency, presentation, safety, and respect for ingredients all begin with a properly selected, sharpened, and maintained blade.
The discipline of a professional cook can be seen in the condition of the tools.
The Professional Standard
Why a Sharp Knife Matters
Sharpness is not a luxury. It is a working standard that influences safety, efficiency, food quality, consistency, and the professional confidence of every cook.
🛡️
Safety
A dull blade requires greater force and is more likely to skid, twist, or slip.
A sharp knife improves control when used with correct technique.
🌿
Ingredient Quality
Clean cuts reduce bruising, crushing, torn fibers, moisture loss, and oxidation
in herbs, vegetables, fish, meat, and delicate garnishes.
⏱️
Efficiency
Less resistance means faster preparation, reduced fatigue, smoother station work,
and better consistency during high-volume production.
👨🍳
Professional Discipline
Maintaining knives teaches patience, repetition, tool awareness, and respect for
craftsmanship—qualities that carry into every part of kitchen work.
🍽️
Presentation
Even slices cook evenly and plate beautifully. Knife condition directly affects
the finished appearance of the food.
Professional principle:
A sharp knife is safer only when it is paired with correct grip, a stable cutting board,
a secure claw hand, deliberate movement, and full attention.
Know the Tool
Anatomy of a Chef Knife
Understanding the knife helps the cook select the correct cutting area, control the blade, maintain the edge, and communicate professionally.
Essential Distinction
Sharpening, Honing & Polishing
These terms describe different operations. Knowing the difference prevents unnecessary steel removal and protects the working life of the knife.
🪨
Sharpening
Removes metal to create or restore the bevel and cutting apex. It is performed
when the edge is genuinely dull, rounded, damaged, or no longer responds to honing.
↕️
Honing
Maintains or refines the edge between major sharpening sessions. Depending on the
honing tool, it may realign the edge and can also remove a small amount of metal.
✨
Polishing
Uses a fine abrasive to smooth scratches, refine the bevel, reduce the burr,
and create a cleaner, more refined cutting edge.
Water Stone Selection
Professional Whetstone Grit Guide
Grit numbers vary somewhat by abrasive standard and manufacturer. Always read the stone maker's instructions and select the least aggressive grit necessary for the job.
| Approximate Grit | Classification | Primary Application | Professional Guidance |
|---|---|---|---|
| 120–320 | Extra Coarse | Repairing chips, reshaping an edge, correcting severe damage | Removes steel rapidly. Use only when necessary and with careful angle control. |
| 400–600 | Coarse | Restoring a very dull knife or establishing a new bevel | Useful for neglected commercial knives; follow with a medium stone. |
| 800–1200 | Medium / Foundation | Routine sharpening and creating a practical kitchen edge | A 1000-grit stone is a versatile starting point for many double-bevel kitchen knives. |
| 2000–3000 | Fine | Refining the medium-stone edge and reducing scratch depth | Creates a smoother edge while retaining useful cutting bite. |
| 4000–6000 | Polishing | Fine finishing, delicate slicing, premium kitchen knives | Use lighter pressure. Excellent after the primary edge has already been established. |
| 8000+ | Ultra Fine | Specialized polishing, single-bevel work, highly refined slicing edges | Not necessary for every kitchen knife. Best used with advanced technique and the correct blade geometry. |
Important: Some water stones require soaking; others are splash-and-go.
Never assume. Follow the manufacturer's instructions, keep the stone flat, and use a secure
non-slip base.
Edge Geometry
Maintaining the Correct Sharpening Angle
The correct angle is the knife manufacturer's specification—not a universal number. The examples below are practical categories, but the original blade geometry should always guide the final decision.
Thin or Asian-Style Edges
Potentially very sharp, but more sensitive to twisting, hard contact, bones, frozen food, and poor technique.
Many Western Kitchen Knives
A common balance of sharpness, durability, ease of maintenance, and general-purpose kitchen performance.
Heavy-Duty Applications
More edge support for robust tools, but the correct angle still depends on knife design, steel, bevel, and intended use.
Angle means per side. A double-bevel knife sharpened at 15° per side
has an included edge angle of approximately 30°. Single-bevel Japanese knives require
specialized technique and should not be treated like ordinary double-bevel knives.
Controlled Technique
Water Stone Sharpening: Step by Step
Work slowly. Consistency matters more than speed, excessive pressure, or counting identical strokes without evaluating the edge.
1
InspectIdentify dullness, rolling, chips, uneven bevels, and the correct original edge angle.2
PrepareSoak or splash the stone as directed. Place it on a stable, non-slip surface.3
Set the AngleRaise the spine to the correct angle and lock the wrist into a repeatable position.4
Sharpen Heel to TipMove the full cutting edge across the stone with controlled, even contact.5
Develop a BurrUse the minimum pressure necessary until a light, continuous burr can be detected.6
Change SidesRepeat on the opposite bevel, preserving the intended symmetry or manufacturer geometry.7
RefineMove to a finer stone and gradually reduce pressure to refine the scratch pattern.8
DeburrUse alternating, feather-light passes. Do not leave a wire edge attached to the apex.9
CleanWash away abrasive residue and dry the blade immediately, especially carbon steel.10
Test SafelyUse paper, tomato skin, or another controlled test—never slide a finger along the edge.Sharpening Systems
Comparing Professional Sharpening Methods
Every system trades speed, control, precision, learning curve, and material removal. The best method depends on the knife, the operator, and the needs of the kitchen.
💧
Water Stones
Excellent control, broad grit selection, strong feedback, and the ability to create highly refined edges.
🛢️
Oil Stones
Traditional stones lubricated with honing oil. Durable and effective, though often slower and less convenient to clean.
💎
Diamond Plates
Cut quickly, remain flat, and work well with hard steels. Coarse plates can remove material aggressively.
⚪
Ceramic Stones & Rods
Useful for fine edge maintenance and polishing. Ceramic is hard and effective but can break if dropped.
⚡
Electric Sharpeners
Fast, guided, and practical for some busy kitchens. Aggressive or repeated use can remove more steel than careful hand sharpening.
🧰
Guided Systems
Mechanical angle guides provide repeatability and precision. They are slower to set up but useful for valuable knives.
🌀
Powered Belts & Wheels
Extremely fast and useful in experienced hands, but excessive pressure, poor angle control, or heat can damage the blade.
📐
Laser-Guided Services
“Laser sharpening” usually describes precision angle measurement or guidance combined with an abrasive sharpening process—not a laser beam cutting the edge.
🪵
Strops
Leather or other stropping surfaces can remove a fine burr and polish an already sharpened edge. They do not replace corrective sharpening.
Important correction: An electric or powered sharpener is not automatically
harmful. The risk comes from excessive material removal, unsuitable preset angles, heat,
repeated unnecessary passes, or using the wrong system for the knife. Premium Japanese,
thin, asymmetric, or single-bevel knives should be sharpened with a method appropriate to
their exact construction.
Method Selection
Sharpening Method Comparison
| Method | Speed | Angle Control | Material Removal | Best Application |
|---|---|---|---|---|
| Water stone | Moderate | Excellent with training | Low to high, depending on grit | Professional all-around sharpening and refinement |
| Oil stone | Slow to moderate | Good with training | Usually controlled | Traditional maintenance and durable working edges |
| Diamond plate | Fast | Good with training | Can be aggressive | Hard steels, repair work, flattening some stones |
| Ceramic rod/stone | Moderate | Good | Fine to moderate | Edge maintenance and finishing |
| Manual pull-through | Fast | Preset | Varies; often moderate | Basic commercial knives when the preset angle matches |
| Electric sharpener | Very fast | Preset | Moderate to high | High-volume maintenance with trained, conservative use |
| Powered belt/wheel | Extremely fast | Operator dependent | High | Experienced technicians, butchers, repair work |
| Guided precision system | Slow to moderate | Excellent | Highly controlled | Premium knives and repeatable bevel creation |
Visual Knife Library
Culinary Knife Cards
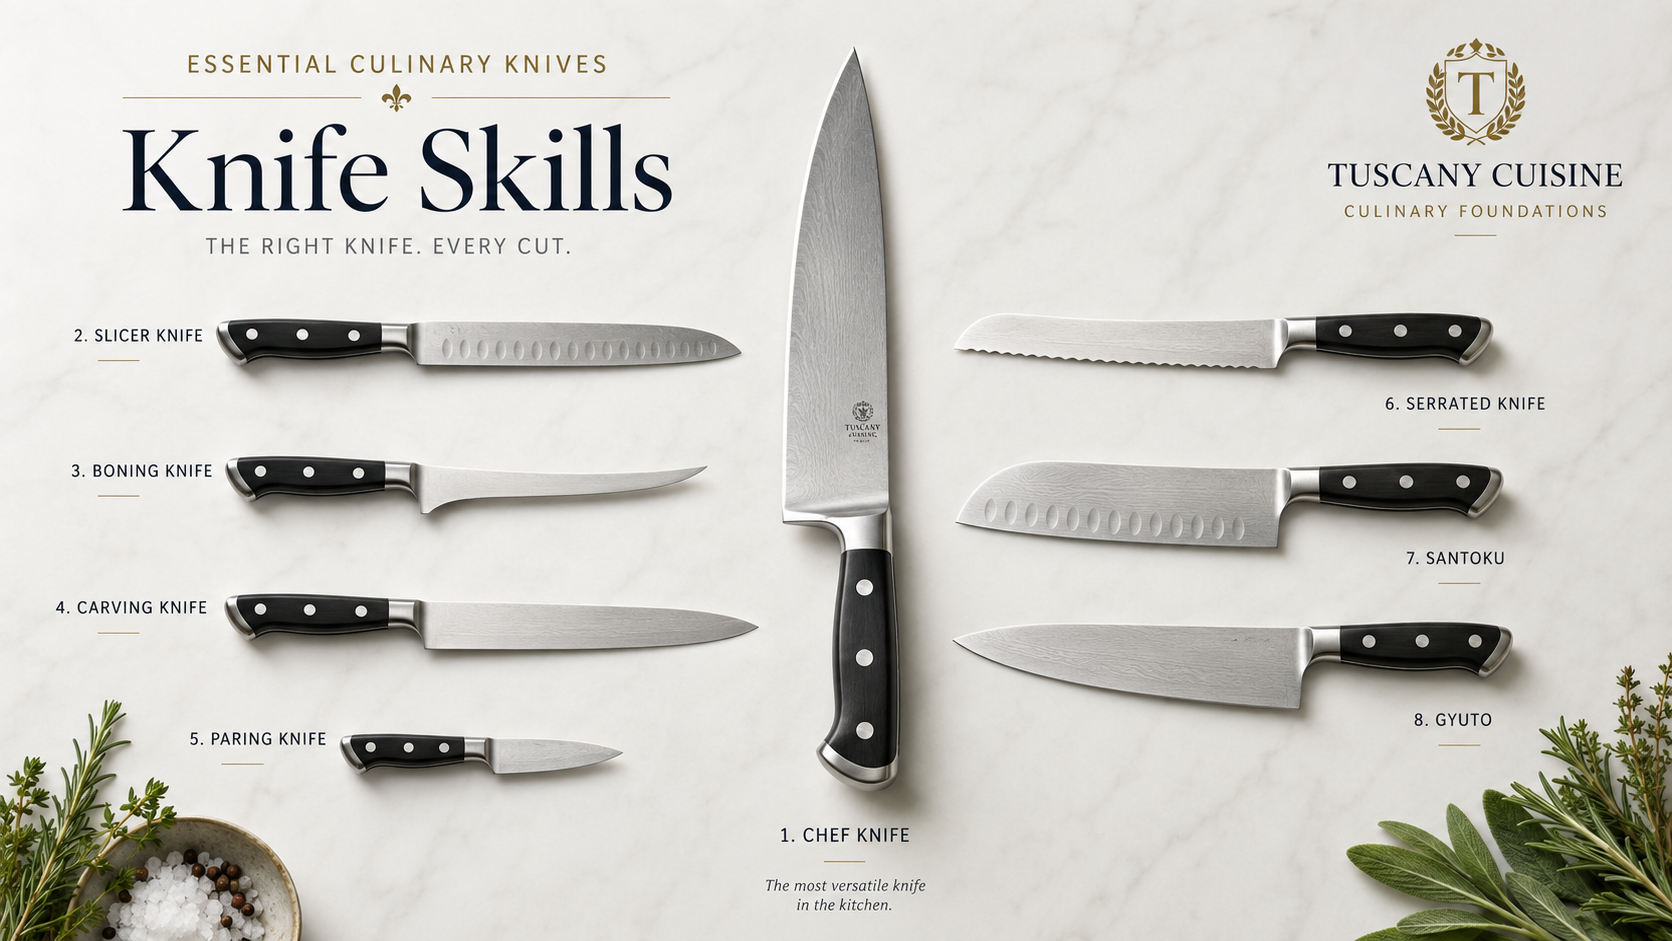
This section begins the Tuscany Cuisine visual knife library. Each card carries the knife graphic, the culinary usage, and practical professional guidance. We start with the most essential tool in the kitchen: the chef knife.

Chef Knife
The primary all-purpose knife of the professional kitchen.
A chef knife is the core working knife for daily mise en place. Its broad blade and balanced profile make it suitable for chopping, slicing, mincing, dicing, rocking herbs, cutting vegetables, trimming boneless proteins, and handling most general station preparation.

Carving / Slicer Knife
A long, narrow blade designed for clean uninterrupted slices.
The carving or slicer knife is used when presentation and portion consistency matter. Its long blade allows the cook to make smooth draw cuts through cooked roasts, poultry, terrines, smoked meats, cured meats and other boneless proteins without the short sawing motion that can tear the surface.

Boning Knife
A narrow precision blade for working closely around bones and connective tissue.
The boning knife is an essential butcher and protein-prep tool. Its narrow blade provides control when separating meat from bones, removing silver skin, trimming sinew, cleaning poultry joints, shaping meat cuts and performing detailed protein fabrication where a chef knife would be too broad.

Paring Knife
A small precision knife for close, detailed hand work.
The paring knife is used for tasks that require fingertip control rather than the reach of a chef knife. It is ideal for peeling, trimming, coring, turning vegetables, removing blemishes, segmenting small fruit and performing garnish work where accuracy matters more than speed.

Serrated Knife
A toothed blade for crusty exteriors and delicate interiors.
The serrated knife excels where a smooth edge can crush the product before penetrating the surface. Its teeth grip crusts and skins, making it especially effective for bread, rolls, cakes, ripe tomatoes, citrus and other foods with a firm exterior and soft interior.
Commercial kitchen core set:
Chef Knife, Carving / Slicer Knife, Boning Knife, Paring Knife and Serrated Knife
are now represented as visual culinary cards. Future additions can expand the
library with Santoku, Gyuto, Nakiri, Fillet Knife, Sujihiki, Deba, Yanagiba
and other specialized professional knives.
The Right Knife for the Job
Professional Culinary Knife Reference
Blade length, geometry, steel, flexibility, and edge angle vary by manufacturer. This table describes common professional applications rather than universal specifications.
| Knife | Typical Size | Primary Application | Technique / Caution | Sharpening Note |
|---|---|---|---|---|
| Chef's Knife | 8–12 in. | General chopping, slicing, mincing, portioning | Rock, push-cut, or slice according to blade profile | Match the manufacturer's double-bevel angle |
| Gyuto | 210–270 mm | Japanese all-purpose chef knife | Excellent slicing and push-cutting; avoid bone and twisting | Often a thinner edge; confirm exact angle |
| Santoku | 165–180 mm | Vegetables, boneless proteins, general preparation | Shorter, agile blade; commonly used with push cuts | May use a lower angle than Western knives |
| Nakiri | 165–180 mm | Vegetable preparation and straight chopping | Thin edge; not a bone cleaver | Maintain the flat profile and thin geometry |
| Paring Knife | 3–4 in. | Peeling, trimming, turning, detail work | Control with fingertips; cut away from the hand when possible | Use a small stone or guided method carefully |
| Utility Knife | 5–7 in. | Small produce, sandwiches, light slicing | Bridge between paring and chef knife | Follow edge style: plain or serrated |
| Boning Knife | 5–7 in. | Removing meat from bone, trimming sinew and silver skin | Use controlled short strokes; flexibility varies | Preserve the narrow profile and point |
| Fillet Knife | 6–10 in. | Skinning and filleting fish | Flexible blade follows bones; never force sideways | Sharpen gently to preserve flexibility and thinness |
| Bread Knife | 8–12 in. | Bread, cakes, crusty products, delicate skins | Use a sawing motion without downward crushing | Serrations require a tapered rod or professional service |
| Slicing / Carving Knife | 9–14 in. | Roasts, poultry, terrines, smoked meats | Long, uninterrupted slicing strokes | Refine for a clean slicing edge |
| Sujihiki | 240–300 mm | Precise slicing of boneless proteins and fish | Long draw cuts; avoid hard contact | Thin edge benefits from fine finishing |
| Chinese Chef's Knife | 7–9 in. | Vegetables, herbs, boneless meat, scooping food | Not all Chinese chef knives are designed for bone | Angle depends on thin slicer versus heavy chopper |
| Meat Cleaver | 6–9 in. | Heavy joints, bones, robust chopping where designed | Use only on appropriate blocks with clear striking space | Requires a stronger, more durable edge geometry |
| Deba | 150–210 mm | Traditional Japanese fish fabrication | Usually single bevel; specialized technique | Sharpen only with correct single-bevel method |
| Yanagiba | 240–330 mm | Sashimi and refined raw-fish slicing | Single long draw cut; highly specialized | Single-bevel sharpening and ura maintenance required |
| Oyster / Shellfish Knife | 2.5–4 in. | Opening oysters and shellfish | Use a guard and protective glove; it is not a slicing knife | Maintain the point and functional edge conservatively |
Protect the Edge
Daily Knife Care in a Professional Kitchen
Sharpening cannot compensate for poor storage, unsuitable cutting surfaces, careless washing, or using the knife for tasks it was never designed to perform.
Professional Practice
- Wash the knife by hand immediately after use.
- Dry it completely, especially carbon steel.
- Use wood, quality synthetic, or approved rubber cutting boards.
- Keep the board stable with a damp towel or non-slip mat.
- Store knives in a block, saya, guarded rack, or knife roll.
- Hone or touch up only when the edge needs it.
- Sharpen before excess force becomes necessary.
- Use a bench scraper—not the cutting edge—to move food.
- Inspect handles, rivets, tips, chips, and edge condition regularly.
Practices That Damage Knives
- Leaving knives loose in a sink or dish tub.
- Cleaning premium knives in a dishwasher.
- Cutting on glass, stone, ceramic, or metal surfaces.
- Twisting the blade while it is embedded in food.
- Using a chef knife to open cans, pry lids, or cut wire.
- Chopping bones with a thin vegetable or slicing knife.
- Scraping the board with the sharpened edge.
- Sharpening repeatedly when honing or deburring is sufficient.
- Testing sharpness by sliding a finger along the edge.
Knowledge Check
Which tool is usually the best starting choice for routine sharpening of a normally dull double-bevel chef knife?
“A chef is recognized not only by the dishes created, but by the respect shown to the tools. A well-maintained knife reflects discipline, craftsmanship, precision, and professionalism.”— Chef David Giani · Tuscany Cuisine Culinary Academy